One of the first things I ever did to pimp out a game was make tuck boxes for various game card decks. Sometimes tuck boxes are necessary for a game due to poor insert design or because you’ve expanded a game too much and had to ditch the insert all together. Other times, tuck boxes are a natural pimping addition to help explore more of the theme of the game while keeping things organized.

The first tuck box I ever made was for Fantasy Flight’s Fury of Dracula (2nd edition). This was due to a combination of convenient storage as well as an awkward game design choice where the event card deck made you draw cards from the bottom of the deck because secret information was placed on both the front and back of the cards. Boardgamegeek user Jupklass had an innovative tuck box solution that featured a flap that folded down within the tuck box to hide the extra information on the back of the cards.
After making that tuck box, I started finding all sorts of games that I wanted to use tuck boxes for. Boardgamegeek is a great resource to find fan-created ones but I soon wanted to make my own. There are quite a few different tuck box generators on the web but the one I’ve been using for years is an old one set up by Craig Forbes: Tuck box generator.
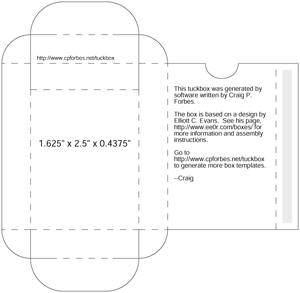
This generator gives you a pdf of your tuck box based on the settings you put in. I recommend getting your deck put together and measuring it, making sure to give a mm or two for clearance. If you’re going to sleeve your cards, you’ll want to measure for that instead.
After getting the pdf, I like to run a quick test print on stock copy paper to cut out and mock up to make sure my measurements were correct and that I’m happy with the size. If the printout passes the mock up test, then it’s time to design your image and print a final copy for actual game use. Even if you aren’t making a custom tuck box and instead are printing a design from the someone else, I still recommend a quick low-resolution test to make sure you don’t need to manipulate any of the measurements to fit your situation.
For most of my image manipulation and design, I use Illustrator and Photoshop but less complicated designs can get away with other program options. My versions of Illustrator and Photoshop are old as I got them in college but it makes importing pdf files easy and maintains some options for manipulation.

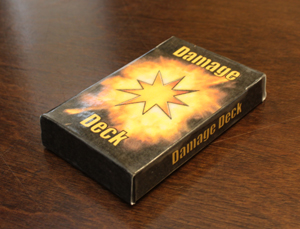
So the above example is a custom tuck box I made for FFG’s Star Wars: X-wing Miniatures game. Since I’m only making one, I didn’t care about having full black coloring and the amount of ink that might use up but that can be a consideration when designing your own. Since I’ve played in quite a few tournaments, having a simple storage solution for the game’s damage deck is pretty handy. As these were going in my custom Millennium Falcon carrying case, I wanted to dress up the box so that it wasn’t just some generic looking after thought.
To create the actual tuck box, I print my boxes on cardstock paper and then, depending on how much I’ll use the game, laminate the printing using self-adhesive laminate sheets that you can find in office supply stores or Amazon. These sheets provide long-lasting protection to a box that will see serious use, like my tournament damage deck box.
After printing and laminating, I cut the box out with sharp scissors or an X-acto knife (if the box is small enough). Fold the box together and then glue it to finalize. I’ve used a variety of glue options from straight white glue (like Elmer’s) to super glue. If I’m not laminating, a lot of glues may be too “wet” and cause colors to bleed/fade as the glue dries so I’ll switch to a contact cement. Remember to have plenty of ventilation when using the more exotic glue options.
After the glue dries, you should be ready go and can start using your box to help carry and organize your cards.